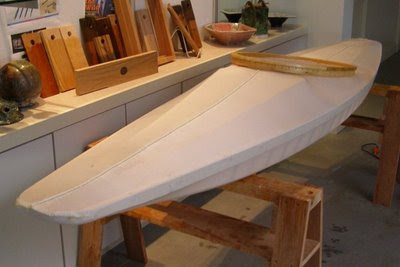
After getting home from Bhutan, between climbing, geocaching and biking, I oiled the frame - two coats of Waterlox tung-oil finish. I was nervous about sewing on the canvas, having never done this before, but it turned out to be not that hard. Some pushpins or staples around the gunwales helped hold things tight, and the sewing went pretty smoothly. I did re-do the stern, as after one go I thought I really understood the technique, and could do a better job - which I did. I followed the sewing method from the Robert Morris book, Building Skin-on-Frame Boats. Morris runs Brewery Creek Small Boat Shop, in Vancouver http://brewerycreek.ca/ , and offers boatbuilding classes.
Shrinking was greatly facilitated by information I got from http://www.skinboats.com/ . I will make use of this when we do the skin canoes. I got onto their website while looking for 2-part polyurethane as noted in Building the Greenland Kayak : A Manual for Its Construction and Use by Christopher Cunningham.
Note the iron - this worked very well, getting rid of all of the wrinkles seen in these photos.This photo shows how the skin is sewn to the cockpit rim. This is the only attachment of the rim to the boat. I have some ash floor-boards for the cockpit, but may just try a piece of foam or a crazy-creek chair pad for starters, until I see how things work.
The blunt end of this, versus the point of the traditional Greenland boat, made the front seam a little less elegant, but not bad.
This morning, I nearly finished roughing out the Greenland-style paddle, and I have a tuitsog (sprayskirt) pattern ready to make a prototype. Hopefully I will coat the hull tomorrow. Again, the http://www.skinboats.com/ website has been a great source of information and instruction.
As with every boat I build, I see things that I would do differently next time, and probably will learn more when I actually paddle this one. As someone quipped to me recently; boats are like potato chips; bet you can't build just one!


