8/20/08

Skin-on-frame 'recovery' kayak almost done


Paddle is almost finished - just a bit of sanding and oiling to do.
Put the last of the two -part poly on the deck today. All that remains is to add at least one set of deck lines.


I'm excited to try this out this weekend!

8/13/08

Last Days of Summer

With summer coming to a close - as indicated by an email from our Dean of Faculty, including schedules for the opening of school - I'm trying to put the finishing touches on my 9'-6" 'recovery kayak'.


After getting home from Bhutan, between climbing, geocaching and biking, I oiled the frame - two coats of Waterlox tung-oil finish. I was nervous about sewing on the canvas, having never done this before, but it turned out to be not that hard. Some pushpins or staples around the gunwales helped hold things tight, and the sewing went pretty smoothly. I did re-do the stern, as after one go I thought I really understood the technique, and could do a better job - which I did. I followed the sewing method from the Robert Morris book, Building Skin-on-Frame Boats. Morris runs Brewery Creek Small Boat Shop, in Vancouver http://brewerycreek.ca/ , and offers boatbuilding classes.

Shrinking was greatly facilitated by information I got from http://www.skinboats.com/ . I will make use of this when we do the skin canoes. I got onto their website while looking for 2-part polyurethane as noted in Building the Greenland Kayak : A Manual for Its Construction and Use by Christopher Cunningham.

Note the iron - this worked very well, getting rid of all of the wrinkles seen in these photos.

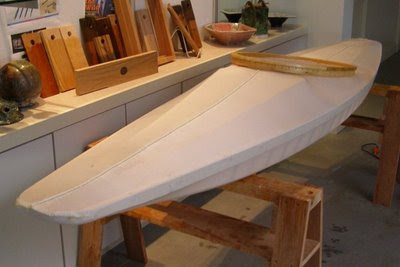
This photo shows how the skin is sewn to the cockpit rim. This is the only attachment of the rim to the boat. I have some ash floor-boards for the cockpit, but may just try a piece of foam or a crazy-creek chair pad for starters, until I see how things work.


The blunt end of this, versus the point of the traditional Greenland boat, made the front seam a little less elegant, but not bad.

This morning, I nearly finished roughing out the Greenland-style paddle, and I have a tuitsog (sprayskirt) pattern ready to make a prototype. Hopefully I will coat the hull tomorrow. Again, the http://www.skinboats.com/ website has been a great source of information and instruction.

As with every boat I build, I see things that I would do differently next time, and probably will learn more when I actually paddle this one. As someone quipped to me recently; boats are like potato chips; bet you can't build just one!

5/29/08

5/28/08

Launch day - video to follow


Here we are heading down to the lake. This was the most nerve-racking part for me, as the trailer was made for longer boats, but these looked rock steady. The 'official' launching was not very. After a quick set of instructions to the two groups of guys, we all just got on the water and tried out our boats.

A bit of comic relief ensued when we discovered that Phil Brady's rigging was in backwards. If you look close at the photo below, you will see his feet pointing toward the bow of the boat - not good for rowing. This was easily fixed, and it seemed like a good time was had by all as people started to get used to their boats.


Alex Bartell


The new boathouse

5/27/08


This is it! The boats are done, and we will transport them down to the lake tomorrow morning.
Everybody gets a chance to try them out, show them off, etc.

5/26/08


We will do some final finishing touches later today (Memorial Day) and the launching is on Wednesday.

5/17/08


5/13/08

Oxford Shells: with one final coat of epoxy on Phil Brady's boat, all the shells will be 'done'. Now comes sanding and varnishing /painting.

Skin-on-frame boats: the two 'older' boats have paint on them, we just need to build up coats, then attach the rubs. It is unclear whether we will have time to do paddles.

Chris Ross's boat is getting the thwarts today, and we will spray the frame with polyurethane, to speed up the process.

5/8/08


5/5/08

This is where the Recovery Kayak is so far. The cockpit rim is finished and drilled. The stringers are soaking overnight. Two short deck stringers will span between the masik (deck beam) and the bow. On the bottom, there will be two chine stringers - more or less round - and two slightly smaller ones to keep the skin from hitting the ribs on the sharper curve of the sides.
After that, the only things left to do are oil the frame and skin it, which is a process I have NOT done before and involves sewing the skin in place .


With luck, I might have this done in time to test when the boys test their own boats, during the school's exam week, but that's not a priority.

The yellow object in the kayak is a float bladder, made of heat-sealable fabric, but modeled after a skin bladder as might be used by native Amerindians.

5/1/08

Skinning starts


Skinning is underway. Anyone who has ever stretched an artist's canvas would have a clear understanding of how this proceeds. We start amidships with a few staples on each side, then work toward each end, alternating sides and pulling the canvas down and diagonally toward the ends as we go.

At the bow, the fabric has to be slit and overlapped on the stem and knee. All the cutting of the nylon canvas is done with a hot knife (we use an old woodburning tool with a sharp edge, and it works great), so the fabric won't fray.

Oxford Shells

In a perfect world, all of these would proceed at the same pace, and we would have 4 identical boats, and would all be doing the same steps at the same time, which would probably be more efficient.


But things are what they are, so two boats are getting their cockpit trim and bow wash today, while two are having the mounts for the Pantidosi Row Wing installed. In any case, we are well on target to finish them all before school is out. Coming up: lots of sanding and varnishing. We will have to either move the boats out or thoroughly clean the work room.


'Rudolf'

Recovery Kayak


The Recovery kayak cockpit rim is completely glued up. In retrospect, since I almost had to laminate this one layer at a time, it might have been just as easy to make a longer steam box and make the rim by steam-bending. I have the form, for future projects, at least. This is six layers of .1 inch ash, 1.5 inches wide (so the rim is nearly .75 inches thick) with an additional .5 inch rim two layers thick.

The piece above is the assembly that started out as in the photo below:


4/30/08

Stats

I was doing a tally of the boats built by Salisbury Students since we began the program, and was a little surprised by the numbers:

30 boats, all together, plus 5 I've built myself.

4/26/08

Skin-on-frame Canoes


The frames are finished and coated. We will now be working on floorboards, a cushion seat, and when the frames are completely dry will be skinning the boats.


Chris Ross started at the beginning of the spring term, but by having the stringers and gunwales pre-milled, and the strong-back set up for him, we are making great progress. He is also a great worker, doing some tasks on his own time.


We added the 'makers marks' today. We got these, by the way from http://www.makers-marks.co.uk/ . They were very reasonable, even for small batches, and add a nice touch to the finished boat.

Oxford Shells


All four boats are decked. On two, the cockpit rim and deck wash are on, and we are beginning to prepare the mounts for the Pantidosi Row Wing.

4/18/08


4/17 Rear decks are on the last two shells. The other two have are nearly 'built'. (See photo) Just a bit of fairing and filleting with the wood-flour mix and they will be ready for a final coat of unthickened epoxy.


4/11/08

Two Oxford shells have both decks on. We are still installing the skegs on the other two.


We used just four screws for alignment, then used duct tape / packing tape to hold the decks down. The only down-side to this, that I can see, is that if you have a lot of overhanging material, the tape tends to make the deck 'hump up' or take a smaller radius than it should. We solved this by pre-trimming most of the excess plywood, thus reducing the possible leverage on the edges.
The sail rig is moderately successful. It needs some tweaking. I found I had to move the pivot point down from the thwart to the floorboards, and amidships a bit. The lashing of the sail to the spars needs rethinking, so the whole rig stays in place better. Since the boat has no keel, and tends to turn into the wind without the sail, steering is problematic. With a good wind, I can drag the double-blade on the appropriate side to keep her straight. I'll keep working on it.

4/9/08

Now for something not completely different

Sails for canoes.

Working from the book Canoe rig : the Essence and the Art : Sailpower for Antique and Traditional Canoes, by Todd E. Bradshaw, I am trying out a simple sail rig for the skin-on-frame canoes. Any sailor will quickly see that this will only work downwind, but it is light and easy to put together, so I'm going to test it soon.


I may have to come up with something more elegant than the zip-ties holding the 'anchor' block, but until I see how this works, I want something I can remove easily. The ends of the spars are not actually attached, but simply rest in oversized, round-edged holes. I suppose I could also lash the end eyelet to the thwart, but I want to see if this works, first.


4/4/08

Skin-on-Frame Canoes (2)

This is where we are on the 4th of April. The boat which is furthest along is ready (note to self: double check everything) for sealing. The first boat I ever made was coated with water-based polyurethane, but since the student projects have a different rhythm, with lots of drying time, we've use Waterlox tung oil, with good success. Two coat of the 'regular' formula and then a top coat of their more heavy bodied marine formula. This last takes a long time to dry, so while it is doing so, we make the floor boards and seat cushion and start on our paddles.


Below is a detail of the breast-hook, with the rubrails in place (though they will come off again to varnish and to skin the boat.


Below: the thwart attachment below the gunwales - also shows the lashing of rib to stringer.

4/2/08

Stitch and Glue Oxford Shells (2)

4/3 While we have about a week spread between the two 'sections' of guys doing this kit, we are still in good shape schedule-wise. The guys furthest along will be decking next week.

4/9 All the hulls are 'glassed' now. I feel like we have turned a big corner, and the hardest work is behind us.


The photo just above shows the aft hatch opening and the aft deck attached.